

Nefra, Who Bars the Way | Gate Commander Draxus | Grob'Thok, Who Feed the Forge | Corruptor Zero | Dread Master Brontes
Mechanics:
Enrage Timer
555 seconds (9m 15s)
Phase One - Hands and Fingers of Brontes
Objective
To push both Hands to 40% health with no Fingers of Brontes active.Dread Master Brontes
Upon engaging the boss, Dread Master Brontes will immediately vanish, teleporting and becoming immune (Empowered Static Barrier) in the northern end of the room and spawning a Left and Right Hand of Brontes and two Fingers of Brontes.

 |
Finger of Brontes
Health: 50,303
|
Fingers of Brontes: Spawn
Two Fingers of Brontes spawn at the start of the fight and then again every 40 seconds in preset but randomized locations.
Focused Beam
Phase One Fingers of Brontes will spawn with the buff Focusing…, which lasts for 20 seconds and serves as a soft enrage to the Fingers if not downed in the allotted timeframe.

At the end of the buff, the Finger will gain access to the ability Focused Beam, which functions similar to Pulse Beam but places a stacking debuff called Focused Incineration on anyone it hits, increasing damage taken by 50% per stack.

The Focusing… buff should never expire if DPS are sufficiently target swapping as they should.
|
Left/Right Hand of Brontes
Health: 596,958
|
Hands of Brontes
Players who have experienced the hard mode Brontes encounter will have a firm grasp of how the Hands of Brontes work, and many of those concepts are directly conveyed in the Nightmare variant. The first round of Hands (100%-80%) spawn in the center of the room parallel to one another (the same position as hardmode). Hands do a conal Slam attack which leaves a devastating debuff on anyone caught in the blast after each burrow and forcing a tank swap (described below). Hands burrow underground at 80%, 60%, and 40%, and their attacks are delayed for 3 seconds upon surfacing.
Unlike hard mode, the reemergence of Hands from burrowing will occur in preset but randomized locations. Tanks should be weary of where each Hand spawns and rapidly close the gap and reposition the tentacle away from the raid group.
Sub 40%, the Hand will despawn. When both Hands despawn, Phase Two will commence.
Slam
Slam is a conal attack that reaches 70m and is on a 3 second global cooldown. Any time a player is struck by Hand of Brontes, they will receive a Touched (Left/Right Hand) debuff.
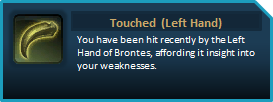
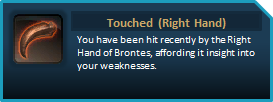
Whenever that Hand of Brontes burrows underground, any player afflicted by the Touched (Left/Right Hand) debuff will receive a Left/Right Hand Attunement debuff, increasing the damage that player takes from that Hand of Brontes for 30 seconds.

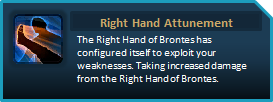
Attunement requires a tank swap after each burrow, with DPS lightly attacking the reemerging Hand to minimize the risk of pushing the Hand before the debuff can expire (discussed in greater depth in the Strategy section).
|
Energy Sphere
Health: Immune to Damage
|
Energy Sphere: Spawn
Energy Spheres begin spawning immediately in Nightmare mode as opposed to midway through Phase Three. In Phase One, an energy sphere will spawn after ~8 seconds of engaging Brontes and then again every 30 seconds until both Hands of Brontes drop below 40%.
Reactive Energy
As in Hard mode, energy spheres are immune to and reflect damage (Reactive Energy) and instead are destroyed by running into them.

The reflect mechanic of Reactive Energy behaves strangely however, and seems to only reflect indirect sources of damage such as the damage component of Rebuke/Cloak of Pain.
Diffusion and Focused Discharge
Just like Hard mode, players should keep an eye out for the damage-dealing tether (Energy Arc) connecting from the Energy Sphere to a player. That player should target and kite the Energy Sphere away from the raid group, watching the of Diffusion buff on the sphere and running into it between 15 and 19 stacks.

Running into the spheres causes Focused Discharge to occur, a proximity-based explosion dealing variable damage based upon Diffusion stacks and cooldowns. Note that, unlike in Phase Five where the Hands and Energy Spheres occur simultaneously, the Hands cannot be used to destroy them. Therefore it is up to the raid to handle their own spheres, knowing the functionality of defensive cooldowns and clutch awareness of personal health.
Allowing the Energy Sphere to reach 20 stacks will force it to trigger Unstable Detonation, dealing massive internal damage to the entire raid.
Energy Field
Though negligible, it is important to note that the Energy Spheres are also buffed with Energy Field, which deals light proximity area damage every second they are alive to anyone nearby. The less time they spend atop the raid, the better.
Energy Sphere Threat
Energy Sphere may only be destroyed if their tethered target runs into them to trigger Focused Discharge. However, tanks may taunt a sphere and run into it instead, though they must be weary that the change in targets from the sphere will only last as long as the fixate mechanic of a taunt (6 seconds). After the fixate expires, the sphere will again resume its path towards its original target, and the tank would have to retaunt to try to break the sphere again.
Also note the the Sage/Sorcerer ability Force Barrier will cause the Energy Sphere to choose a new target for the duration of the channel. Expiration of the channel or breaking the Force Barrier channel early will result in the Energy Sphere resuming its path towards the Sage/Sorcerer.
Phase Two - Reaches of Brontes (Transition)
Objective
To survive and not be bad.
Energy Sphere
Energy Spheres do NOT spawn during Phase Two, but spheres from the previous phase will remain.
Reaches of Brontes
During Phase Two, a series of seven pairs of tentacles called Reach of Brontes will spawn (unlike hard mode, which only has four pairs). Each pair of Reaches of Brontes spawn every 3 seconds, with each tentacle spawning directly under a random player and immediately turning to face their partner tentacle. After 1 second, an Overcharge Beam will emit in a straight line in between the two tentacles, instantly killing anyone in its path, and a small proximal energy field called Overcharge Field will spawn at its base, dealing significant damage to anyone caught inside every second.
Each previous pair of Reaches of Brontes will despawn after 5 seconds of spawning, or shortly after the newest pair begins their beam.
What makes this phase more challenging in Nightmare is the introduction of a pair of debuffs both named Static Field, one reducing healing received by 75% while the other slowing the raid to a crawl at 35% of normal movement speed.


The movement reduction can be mitigated by movement speed enhancements or purges of movement-impairing effects such as Resolute/Unleash, though the movement reduction will be rapidly reapplied to your character shortly after use.
Phase Three - Dread Master Brontes and Corrupted Clones
Objective
To push Brontes to 50% health.
 |
Dread Master Brontes
Health: 1,931,418
|
Arcing Assault
Brontes will precast Arcing Assault immediately starting Phase Three and then again every 15 seconds throughout the phase. Arcing Assault begins with a 1 second precast that leads to a 4 second channeled conal attack that deals damage every second and hits anything in its 150m path.
In addition to the damage, each tick of the Arcing Assault cast will apply a stacking (20 max) debuff called lResidual Charge, which increases damage taken by 10% per stack for 15 seconds.

Four stacks are applied for each Arcing Assault channel (one stack per second), leading to a 40% increase in damage taken. This mechanic encourages a tank swap after 4 stacks, though can be removed by a Shadow/Assassin’s Resilience/Force Shroud or mitigated through cooldowns if absolutely necessary (not encouraged).

Important
|
Tank swaps should occur AFTER Arcing Assault has completed its cast. Taunting early can force the new tank to receive unnecessary stacks, or force the entire raid to be hit by Arcing Assault if taunted before positioning in front of the boss.
|
Energy Sphere
Energy Spheres will begin to spawn at ~65% and continue to spawn every 12 seconds until Brontes is pushed to the next phase. For detailed mechanics for Energy Spheres, please revert back to the information provided in Phase One above.
|
Corrupted Clone
Health: 133,948
|
Corrupted Clone: Spawn
A Corrupted Clone will spawn ~8 seconds after the start of Phase Three and then again every 30 seconds in one of five locations randomly, as illustrated in the graphic below:
Charge/Laser Blast
 |
| (Click to Enlarge) |
Upon landing, the Corrupted Clone will begin channeling Charge for 4 seconds. Completing the Charge channel will apply the buff <insert ability name> to the Corrupter Clone, allowing for it to use Laser Blast. Laser Blast is a 35m conal attack that blasts moderate energy damage to anyone in its path every 1.5 seconds.
Dread Bomb
Sub-50%, each Corrupter Clone will leap into the air, becoming immune to damage (but not immune to the threat damage applies) and placing a proximity-based red circle AoE under the player it intends to land on for 3 seconds. Upon landing, anyone under the red circle will be damaged by Dread Bomb for significant damage, and the Corrupted Clone will resume the Laser Blast spam.
Important
|
Dread Bomb is Kinetic damage and thus is extremely punishing to Light armor wearers.
|
Corrupted Nanites (Any)
Corrupted Nanites are a stacking (6 maximum) damage over time effect dealing internal damage every 3 seconds for 12 seconds.

Corrupted Nanites can be removed by any cleanse, and should be done so immediately, as the stacks deal increasingly brutal damage as they are applied. Dying while under the effects of Corrupted Nanites will cause the debuff to jump to another raid member. Arriving at the sixth stack of Corrupted Nanites will cause the nanites to detonate.
Phase Four - Clock Channel and Unshielded D-09 Droids (Transition)
Objective
To kill each Unshielded D-09 Droid before hit by the Energy Beam and to not get hit by the Energy Beam.
Dread Master Brontes
At the start of the phase, Dread Master Brontes will teleport to the center of the room and prepare to channel her Energy Beam. She puts up Overcharge Field, the same proximal energy field from the Reaches of Brontes in Phase Two, dealing significant damage to anyone caught inside every second.
She also buffs herself with an Empowered Static Barrier, a shield preventing all damage.
Energy Sphere
Energy Spheres do NOT spawn during Phase Four, but spheres from the previous phase will remain. Tanks are responsible for taunting and running into the sphere, as DPS must focus solely on burning the Unshielded D-09 Droids.
|
Unshielded D-09 Droids
Health: 106,120
|
Unshielded D-09 Droid: Spawn
Phase Four, as with previous iterations of the fight, begins with SIX D-09 Droids spawning in preset locations. Each droid spawns with a buff called Cracked Power Core, which forces them to explode (and instantly kill the raid) should the powers of the clock Energy Beam come into contact with them.
The Clock Channel (AKA Overcharge Beam)
The Overcharge Beam is a 60 second channel that begins shortly after the start of Phase Four and continues until all Unshielded D-09 Droids have been defeated. This “clock channel” is one of the burst DPS checks of the fight, testing both the ability to burn down multiple low HP targets and the reactivity of the raid group through the new randomization mechanic.
Traditionally in hard mode, the Overcharge Beam would move in a predictable pattern beginning North (at 12 o'clock) and moving clockwise until it returned to 12 o’clock. In Nightmare mode, this only has a 50% chance of occurring. The other 50% chance is for the Overcharge Beam to move counterclockwise, completely reversing strategy and kill order.
Phase Five - Six Fingers of Brontes and Hands
Objective
To kill each Finger of Brontes and then burn down both Hands of Brontes at the same time.
Dread Master Brontes
The crafty Dread Master Brontes once again puts up her Empowered Static Barrier and teleports to the northern area of the map. Though she does not play an active role in Phase Five, she will place small ground-based (distal) purple circles called Spike of Pain that deals moderate elemental damage to anyone standing in it after 3 seconds.
|
Finger of Brontes
Health: 99,475
|
Finger of Brontes: Spawn
Six Fingers of Brontes spawn at the start of the phase in a 2 by 3 pattern.
Threat
Fingers of Brontes, by default, aggro to and attack the closest target to them.
Focus
The Finger of Brontes in Phase 5 begin without the ability to use Focused Beam. Rather than the 20 second Focusing… buff from Phase One, the Fingers instead begin by casting Focus for 5 seconds (note that the Fingers will deal no damage during this cast). At the end of this cast, the Fingers will gain a buff called Focus , which from then on allows them to use Focused Beam.
Unlike in Phase One, the Fingers in Phase Five can be disabled from using Focused Beam by standing within 4 meters of them (i.e. melee range).
Focused Beam
Same idea as Phase One: a direct attack which applies the stacking debuff called Focused Incineration on anyone it hits, increasing damage taken by 50% per stack.

Should never get off in Phase Five. Appearance of the Focused Incineration debuff is indicative of someone not standing in melee range of a Finger.
Knockback
Nightmare difficulty adds a knockback component to each Finger of Brontes, which occurs ~10 seconds after the start of the phase and then again every 30 seconds.
After the knockback, the Finger will apply a Touch of Brontes debuff, which lasts for 15 seconds and will instantly kill any player who returns to their Finger of Brontes that knocked them back through an ability called Bad Touch of Brontes.

At the expiration of the Touch of Brontes debuff, players are safe to return to their previous Finger. This mechanic forces a pseudo-tank swap between DPS and healers, and will be discussed in greater detail in the Strategy section.
Important
|
The Fingers of Brontes in this phase have a four second global cooldown after using the knockback, allowing for plenty of time for players to swap to their new Finger before the requirement of being in melee range resumes.
|
|
Hand of Brontes
Health: 597,023
|
Hands of Brontes: Spawn
Two Hands of Brontes spawn in the same position as where they begin the fight. Note that the denotation of ‘Left’ and ‘Right’ is absent in this phase.
Forceful Slam
A conal attack on a 4 second cast time (with a one second delay in between recasts; AKA 5 second GCD) that functions similar to the traditional Slam with a few changes. First, the conal attack is telegraphed to aid tanks in orientation. Second, the Hands of Brontes are armed with the Charged buff.

The Charged buff causes two things to occur:
- Forceful Slam will destroy any Energy Sphere upon touchdown so long as it is angled to hit the sphere.
- Forceful Slam will knockback anyone hit by the telegraphed effect, which should only be the tank holding aggro on it.
In addition, the Hand of Brontes will gain a stacking buff called <insert buff name> every x seconds, which increases the distance Forceful Slam knocks players back.
Energy Sphere
Energy Spheres will begin to spawn immediately at the start of the phase and continue to spawn in one of the four corners every 5 seconds until all six Fingers of Brontes and both Hands of Brontes are defeated and the final phase is triggered.
Note that, despite it being the responsibility of the tanks to destroy Energy Spheres through the Hand of Brontes’ Forceful Slam, it still is possible for players to manually destroy spheres if one slips past. Players should be cautious about leaving their Finger of Brontes, however, and should only break their sphere if a player can take over their Finger.
For detailed mechanics for Energy Spheres, please revert back to the information provided in Phase One above.
Phase Six - Dread Master Brontes and Hands (Burn Phase)
Objective
Burn Dread Master Brontes until Manifest Supremacy stacks become unbearable, then burn a Hand of Brontes to clear the debuffs. Rinse repeat one more time, then kill before overwhelmed by Manifest Supremacy debuffs.
|
Dread Master Brontes
Health: 1,931,418 (starts at ~60% health)
|
Dread Master Brontes: Spawn
Dread Master Brontes spawns in the center of the room with her Empowered Static Barrier shield making her immune to damage and casting Supremacy. All Phase 5 Energy Spheres will despawn as Phase 6 begins.
Supremacy
Supremacy is a 10 second cast that heals Dread Master Brontes for approximately 10-13% of her health and is mitigated by Trauma debuffs that reduce healing. At the end of the cast, her Empowered Static Barrier shield expires and she is once again susceptible to damage.
Mass Supremacy
When Brontes becomes attackable, she gains a buff called Manifest Supremacy, which passively deals area kinetic damage every 5 seconds.

Manifest Supremacy also applies a stacking debuff of the same name that increases damage taken by 10%. Stacks up to 50 times, though you’d be lucky to survive in the single digits.

Fire and Forget
Fire and Forget is Dread Master Bronte’s signature direct damage source for the final phase. She will focus the target with the highest threat against her, lift them up and stunning them for 2 seconds, and then knocking them back while shooting them for twelve consecutive blasts of Fire and Forget kinetic damage over two seconds.

In addition, Fire and Forget will force a sizable (appears to be ~20%) aggro drop on her target, making that player less likely to be the focus of another Fire and Forget until other raid members take a turn.
Spike of Pain
As in the previous phase, Dread Master Brontes will place down Spike of Pain purple circles that deals moderate elemental damage to anyone standing in it after 3 seconds, though their radius is significantly larger in the final phase.
|
Hand of Brontes
Health: 600,886 (starts at ~10% health)
|
Hands of Brontes: Spawn
At the end of Dread Master Bronte’s Supremacy cast (at the start of Phase 6), two Hands of Brontes spawn at opposite corners of the room (one in the Northwest corner and one in the Southeast Corner). Note that the denotation of ‘Left’ and ‘Right’ is absent in this phase.
Forceful Slam
For detailed mechanics for Forceful Slam, please revert back to the information provided in Phase Five above.
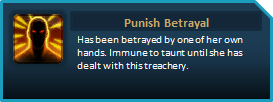
Negation Shield and Punish Betrayal
Pushing a Hand of Brontes to ~5% health forces it to surrender, becoming immune to damage and creating a Negation Field shield which will purge any Manifest Supremacy debuffs on players who enter it and make them immune to dealing and receiving damage.

During which time, Dread Master Brontes becomes immune as she deals with the treacherous limb, casting Punish Betrayal over 10 seconds which results with the destruction of the Hand. Occurs twice, once for each Hand.
Strategy:
WORK IN PROGRESS
Overview
The final encounter of Dread Fortress squares your raid group off against one of the Dread Masters, the seductive and wanton Brontes. Dread Master Brontes loves to assail her foes with her quick hands, using her knowledge of ancient secrets to plunge her fingers into the depths of her enemies.
All puns aside, the Dread Master Brontes encounter is the most challenging boss fight in the entire Dread Fortress operation. And while the early phases are prone to wipe-causing mistakes and the occasional middle-finger from Brontes (okay, I lied about being done with puns) in the way of bugs, it is the last phase that can cause most raids to choke. Raids who prefer a reach-around from Brontes as opposed to an open-palmed slap must flawlessly engage her in her arm wrestle until the final phase. For that is when the real challenge begins, and raids must consistently experience and get a feel for this phase before they can ever grasp victory.
Setup
Before initially engaging Brontes, there are a few positional allocations that must be designated prior to the fight.
- For Phase One, pre-assign a tank and two DPS to each Hand of Brontes. The tanks will swap Hands after each burrow, but the DPS will continue on their assigned hand throughout the phase.
- For Phase Three, assign which tank will be picking up Brontes first and which DPS will be assigned to kill the Corrupted Clone (3/4 of the DPS).
- For Phase Five, assign each DPS and healer to a Finger of Brontes (as discussed in the section below) and kill order. Tanks should pick up the same Hand in Phase Five that they did in Phase One.
- For Phase Six, determine which tank will be on which hand, where the raid will stand (which wall) for each part of the phase.
Phase One - Hands and Fingers of Brontes
Objective
To push both Hands to 40% health with no Fingers of Brontes active.
Overview of the Phase
- Engage Brontes
- Kill Fingers of Brontes x2
- Push Hands of Brontes to 80%
- Light DPS on Hands until Finger’s Spawn
- Kill Fingers of Brontes x2
- Push Hands of Brontes to 60%
- Push ONE Hand of Brontes to 40%
- Light DPS on other Hands until Finger’s Spawn
- Kill Fingers of Brontes x2
- Push other Hand of Brontes to 40%
Tanking: Phase One
Assign each tank to either the Left or Right Hand of Brontes. Tanks should always face the Hand toward the closest wall to minimize the risk of cleaving the raid. If a Finger spawns in the path of the Hand’s cleave, tanks should attempt to rotate the Hand slightly to allow melee DPS the opportunity to attack the Finger.

Guard
|
Tanks should Guard a high burst DPS that may unintentionally draw aggro on the Hand early in the phase.
|
Tanks should mark at least one Hand of Brontes to ease in tank swaps. Tank swaps will occur after the Hand they are not tanking burrows underground.
Example: Tank A is tanking the Left Hand while Tank B is tanking the Right Hand. Right Hand DPS pushes the Hand to 80%, but the Left Hand is still at 92%. Tank A must wait for the Right Hand to reemerge and taunt it, tanking both hands until the Left Hand is pushed sub-80%. After which, Tank B will take over the recently emerging Left Hand.
Note that tanks can receive the attention of an Energy Sphere in this phase, and should be weary of spheres spawning in opposite corners to where their Hand is currently positioned, as they can rapidly gain their 20 stacks of Diffusion long before they ever reach you. As a tank, dispose of any spheres tethered to you as best as you can. Vanguards/Powertechs and Shadows/Assassins can pull the lumbering ball of light to them early with Harpoon/Grapple and Force Pull/Force Pull respectively.
Important
|
Just because a tank cooldown allows you to take an Energy Sphere with low stacks of Diffusion does not mean that the players around you can endure the hit. Be sure that you are clear of any friendly raid members before zerging an Energy Sphere.
|
DPS: Phase One
Pre-assign two DPS to each Hand of Brontes (preferably ONE melee and ONE range each), and they will remain on that Hand even after they burrow and reemerge. The only exception to this is the [60%-40%] HP interval, in which it is preferable that ALL DPS swap to one Hand and burn it down as they await the final spawn of Fingers.
Phase One is fairly simple for DPS classes and does not require much in the way of exceptional performance. DPS priority is always Fingers of Brontes before Hands of Brontes. DPS groups will kill at least one Finger of Brontes before resuming damage on the Hands. Range DPS should always make sure the Fingers are dead before attacking the Hands, as melee travel time may warrant them leaving the Finger early to return to their hand.
Because DPS will be dealing with Energy Spheres throughout this phase, damage can inevitably fall uneven between the two fingers. Assign one or more Range DPS to float between their Hand and the opposing Hand to ensure they both fall at relatively equal intervals.
Healing: Phase One
As most of the deaths that can occur in this phase are typically one-shots (DPS/Tanks messing up Energy Sphere disposal or faulty tank swaps), healing is fairly straight forward. Healers should monitor their positioning on the map, avoiding the path of destruction of the Energy Spheres and the Slams from the Hands of Brontes.
Healers should also know that premature tank swaps before Left/Right Hand Attunement debuff expires can result in some nasty tank damage. Extra focus healing can get you through these moments.
Note that it is exceedingly rare for a healer to get tethered to an Energy Sphere, and often occurs only as a result of the previous tethered player dying before the sphere could be destroyed. If the mechanics of Phase One are performed correctly, healers can safely bet they will never have to handle a sphere.
Phase Two - Reaches of Brontes (Transition)
Objective
To survive and not be bad.
Energy Spheres
As discussed in the mechanics section of this guide, residual Energy Spheres will continue to exist during this phase. If possible, tanks should assist others in destroying these spheres. If not possible, the player must use any defensive cooldowns available (healers will have a hard time helping due to being easily cut off from the rest of the raid and the 75% healing debuff from Static Field).
Static Field
While the Reaches of Brontes have long been the bane of bad players and terrible computers, the added slow generated by the constantly reapplied debuff of Static Field can actually make this phase a challenge. Sentinels/Marauders should save their 30 stacks of Zen/Fury from the previous phase to pop Transcendence/Predation and aid their raid in avoiding the laser beams. There are obviously numerous other speed-altering abilities than can also aid in this phase, though they are apparent and listing them is excessive.

Bug
|
Latency can often cause players to “rubberband” back into a laser and die, even if they are safe on their own screen. The best way to combat this is to keep moving, even if it appears you have safely moved out of the laser.
|
There are generally two accepted methods of handling Phase Two Reaches of Brontes, the Divide and Conquer and the Power Through Unity. Neither methods are perfect and usage of either is primarily raid preference.
Method One: Divide and Conquer
This method hinges on player ability to look out for themselves, and often appears to be haphazard and random in nature. Upon transitioning to this phase, all players should quickly make a break for the wall and continue moving as the hands spawn. Players should avoid the northern section of the room, as the tank will need to turn Brontes to face that way as her massive Arcing Assault conal begins in Phase Three.
Flaws:
- Players who get caught in the middle of the room will take the brunt of abuse and have a dramatically increased chance of missing a Reach direction and dying.
- One player off his/her game once is enough to have a death and burn a battle rez too early.
- If the Main tank gets caught somewhere where he cannot pick up Brontes, the raid becomes more likely to be struck by Arcing Assault, and may cause a wipe.
- The random nature of Reach spawning can isolate members at the start of the phase. For example, a healer may be cut off from the raid and unable to heal the tank for the first few seconds.
Method Two: Power Through Unity
This method is designed around working together to minimize Reach variance. Players should choose a meeting point somewhere along the lined rectangle along the room and slowly work their way (in unison) along that path, either clockwise or counter-clockwise. The moving group should avoid ending the phase in the northern section of the room, as the tank will need to turn Brontes to face that way as her massive Arcing Assault conal begins in Phase Three. The tank also should break away from the group early, either by speed boosts or charge, in order to avoid inadvertently raining down Arcing Assault on the raid.
Flaws:
- Due to constantly being on top of or near the spawn point of all Reaches, the chances of rubberbanding into one dramatically increase.
- Speed boosts can quickly disperse the group and force Reaches to spawn in undesirable locations.
- Tanks who cannot get to Brontes in time may cleave the raid with Arcing Assault.
Phase Three - Dread Master Brontes and Corrupted Clones
Objective
To push Brontes to 50% health.
Tanking: Phase Three
Tanking in Phase Three is virtually identical to hard mode, in that tanks are juggling stacks of Residual Charge from Arcing Assault while assisting DPS in holding aggro on the spawning Corrupted Clones.
Guard
|
Tanks should swap Guard to Range DPS exclusively during this Phase, as if they pull aggro on the Corrupted Clone, they may Laser Blast the raid or simply die to the excessive AoE damage.
|
Whoever is currently tanking Brontes should face her (North) away from the raid, while the offtank (if not assisting with Kephess) should be standing behind her to avoid Arcing Assault.
Tank swaps should only occur at the end of Arcing Assault and never right before or during, as you risk the incoming tank gaining stacks or cleaving the raid with excessive damage and debuffs. As discussed in the Mechanics section, Shadows/Assassins make exceptional main tanks during this phase (in particular due to their hybrid AoE reduction spec), as their defensive cooldowns can allow them to take the brunt of about three sets of Arcing Assault before needing to swap.
Tanks who swap off Brontes can assist the DPS in handling the Corrupted Clones. When generating aggro on the clone, ensure that you have it faced safely away from the raid. Remember that, during the clones leap for Dread Bomb, aggro is still generated. Make sure to continue to attack it whilst it is in the air, or risk losing aggro and burning an extra taunt.
Important
|
Use extra caution when using an AoE taunt on the Corrupted Clone, as you may unintentionally draw aggro on nearby Energy Spheres and kill yourself or the raid.
|
Tanks who are the target of the Corrupted Clone’s Dread Bomb should ensure that the clone lands safely away from others to minimize the need for unnecessary extra healing while popping defensive cooldowns. This is especially true for tanks who currently have aggro on Brontes, as they may receive unhealable, lethal damage.
Upon landing (if able to without Laser Blasting the raid or the other tank), the tank with aggro on the Corrupted Clone should reposition the clone to be next to Brontes, as DPS can splash damage onto both targets and push the phase faster and more efficiently.
Tanks can receive Energy Spheres in Phase Three, but not nearly as frequently as the DPS. As a tank, it can be difficult to handle the sphere while having aggro on Brontes. Either have the raid step out before you take the hit, warn the healers that the sphere is inbound, or have the other tank assist you and take it away from the raid.
Use caution when taking spheres for another tank or raid member, as you may burn a taunt you’ll need later.
DPS: Phase 3
Players should do as much damage to Brontes as they can at the start of this phase. When the Corrupted Clone spawns, players should immediately swap to it and focus it down. Corrupted Clones should always take priority over damaging Brontes, especially leading up to her 50% phase change. However, because of the Corrupted Clone’s 50% Dread Bomb leap/immunity, putting all 4 DPS on him is typically overkill. In a typical raid group, you’ll want both (2) Range DPS and ONE melee DPS (preferably a Sentinel/Marauder or Guardian/Juggernaut with Force Leap/Force Charge). The remaining DPS can continue pummeling Brontes, though should swap to the last Corrupted Clone to avoid the risk of pushing the phase.
Tanks do not necessarily need to tank the Corrupted Clone, though it is encouraged that (if they do not) raids instead assign a melee DPS with taunt as a pseudo-tank, and ensuring that the Range DPS have Guard to avoid accidentally pulling the clone and spamming the clone’s Laser Blast on the raid.
Important
|
A great way to gauge Corrupted Clone spawns and whether or not to push Brontes is by using an ability with the same 30 second cooldown at or around the spawn time. Master Strike/Ravage is perfect for this!
|
Raids should expect anywhere from 3-4 Corrupted Clones through this phase, any more and DPS is too light.
Unless confident that DPS will push before a new Corrupted Clone spawns, DPS should hold at about 55% and wait for that last clone to spawn. Note that Corrupted Clones seem to stop spawning when Brontes is about to push (~51%), though an exact number is unconfirmed.
DPS who are the target of the Corrupted Clone’s Dread Bomb should ensure that the clone lands safely away from others to minimize the need for unnecessary extra healing while popping defensive cooldowns.
Similar to Phase One, DPS will frequently be targets of Energy Spheres, and should follow the normal procedure for destroying them (15-19 stacks, away from the raid).
Healing: Phase Three
Overall, like Phase One, many of the deaths associated with this phase can be the result of one shots or massive amounts of incoming damage in short bursts. Healers can do a bit more in this phase, however, to turn the tide and make the attempt successful.
At the start of the Phase, make sure the tank initially taking Brontes gets a large volume of healing, as they will be taking punishment immediately from Arcing Assault. Be weary that your fellow healer may be blocked off from a residual Reach of Brontes, all the more reason to deliver as much healing as you can.
Cleansing the Corrupted Nanites debuff from the Corrupted Clone is essential to lightening the healer load on this phase, and can be accomplished by any class with a cleanse. A player with Corrupted Nanites, an Energy Sphere, and the Dread Bomb from the Corrupted Clone can take earth shattering damage and can easily be diminished simply by cleansing. Anything more than two stacks can result in a death, but healers should aim for no more than ONE stack.
Healers who are the target of the Corrupted Clone’s Dread Bomb should ensure that the clone lands safely away from others to minimize the need for unnecessary extra healing while popping defensive cooldowns. Other players who are targeted can be precasted with big heals to diminish its effects.
Similar to Phase One, healers will almost never receive the Energy Sphere unless other players have died. However, healers should monitor players who are dealing with Energy Sphere and ensure that they are at full health before taking the blast to the face.
Phase Four - Clock Channel and Unshielded D-09 Droids (Transition)
Objective
To kill each Unshielded D-09 Droid before hit by the Energy Beam and to not get hit by the Energy Beam.
Overview of the Phase
The only change between hard mode and nightmare is, as discussed previously, the randomness of the Energy Beam, either going the traditional Clockwise (hardmode) position or reversing it and going Counter-Clockwise. Both possible scenarios are illustrated in the graphic below:
 |
| Click to Enlarge |
Tanking: Phase Four
At the start of this phase (before any Unshielded D-09 Droids spawn), tanks should swap their Guards to healers. This is crucial not only to protect them from the wrath of the droids during this phase, but also from pulling innate healing aggro from the Hands in Phase Five.
Guard
|
Tanks should Guard healers both for Phase Four and Five.
|
If any residual Energy Spheres are left alive from the previous phase, it is paramount that one of the two tanks deal with it. In an ideal world, the tank who is not assigned to the Droid that must die first should pick it up, but it is rarely easy to determine this in the heat of battle.
As for positioning, tanks should each go to one of the starting Unshielded D-09 Droids regardless of the laser destination (either 1 or 5 in the above illustrations). To make it simple, make the assigned droid the same side as the tanks Hand at the start of Phase One.
The tank who goes to the droid that has to die first should treat themselves as a DPS player, killing each droid before moving on to the next one.
Whichever tank draws the short straw (or goes to the side that does not need to be DPS’ed down first) should backpedal from their droid and pick up aggro on a droid before moving on to the next, eventually meeting up with the raid and continuing to burn down droids.
DPS: Phase Four
Not knowing which way the laser will go can be surprisingly tricky, especially for melee DPS. The Unshielded D-09 Droids will spawn with a second or two delay before the laser begins its rotational trek. A good practice to ensure quick reaction is to pre-target one Droid and turn your camera to face the other. If you were right, you can immediately start attacking. If you were wrong, you’re one tab away from attacking.
If possible, have a Sentinel/Marauder with a Transcendence/Predation ready for either when the laser first starts moving (if you have a lumbering melee DPS) or during the laser to catch up (let Range move ahead a bit).
Important
|
Just because you killed the first one or two Droids does not mean you’re in the clear! Sometimes the sluggishness of DPS will build up over time, presenting itself late in the rotation when you think you’re safe!
|
Healing: Phase Four
Assuming tanks have placed Guard on you and are doing their best to mitigate the Droid attacks, healing can be fairly straightforward. It is recommended that at least one healer attempt to take on the role as pseudo-DPS and aid the DPS in killing the droids, while the other pumps out moderate healing and any damage they can spare.
Phase Five - Six Fingers of Brontes and Hands
Objective
To kill each Finger of Brontes and then burn down both Hands of Brontes at the same time.
Setup: Phase Five
As with hard mode, each player must be assigned to a Hand of Brontes (tanks) or a Finger of Brontes (DPS and Healers). Tanks will be assigned to the same Hand they took at the start of the fight (for convenience alone), and will be assigned to destroying two of the four Energy Spheres on their side. In the below illustration, the Offtank is assigned to the east spheres (NE and SE) while the main tank is assigned to the west spheres (NW and SW):
 |
| Click to Enlarge |
Finger Assignments are as follows: Melee DPS 1 at 1, Melee DPS 2 at 2, Healer 1 at 3, Healer 2 at 4, Range 1 at 5, and Range 2 at 6. Players assigned to their Finger will shortly be knocked back, and should aim at being knocked toward the opposing Finger on the opposite side as shown below:
 |
| Click to Enlarge |
For example, using the above graphic, Range DPS 1 started at 5 and was knocked and re-position at 6. Range DPS 1 should then turn again to face the general direction of 5, and will ultimately get knocked back to their original Finger. Raiders should expect two rounds of knockbacks during this phase if damage is appropriate, and typically only Range will have to swap twice.
All players who are assigned to Fingers of Brontes should not place their backs directly facing their swap Finger (though the above two graphics deceptively illustrate that), but rather angled slightly to the left to avoid double knockbacks. Being knocked into the knockback of your intended target is almost always a wipe. The illustration below exemplifies how two healers might position themselves to prevent the double knockback:
 |
| Click to Enlarge |
Players receiving the Focused Incineration debuff is indicative of failure to correctly and quickly swap to the new Finger position.
DPS: Phase Five
The added knockback mechanic makes this fight interesting as DPS, but the core premise remains. Kill the Melee Fingers first, than free up the healers, then last the Range (with melee stepping in for them if damage becomes too much).
Note that Failure typically clears out the melee in unison and then proceeds to have two DPS per side, to ensure Fingers are cleared in a timely manner and with equal uptime on the Hands. Note that the Range DPS will ultimately burn the same Hand from Phase One, while it is easier for the Melee DPS to swap based upon proximity as a result of the earlier knockback.
Melee 1
|
Melee 2
|
Range 1
|
Range 2
|
Kill Order: 1, 2, 4, 6
|
Kill Order: 2, 1, 3, 5
|
Kill Order: 1, 2, 3, 5
|
Kill Order: 1, 2, 4, 6
|
Note that it can be better to go light on Finger 1, as pushing it before the first knockback can cause the Melee DPS inheriting Finger 2 to not get there in time.
After Fingers are defeated, DPS should evenly burn the Hands of Brontes down. Killing one too early can result in Energy Spheres coming into the raid.


0 comments:
Post a Comment