

Nefra, Who Bars the Way | Gate Commander Draxus | Grob'Thok, Who Feed the Forge | Corruptor Zero | Dread Master Brontes
 |
Grob’thok, Who Feeds the Forge
Health: 4,721,244
|
Roar
The conal aoe Roar will now knockback, stun, and dump aggro of anyone caught in it. Tanks will need to swap after each Roar, and be aware of not getting knocked into the magnet. Whichever tank that is not currently tanking the boss should stand to the side/behind in order to avoid the effects of Roar.
Whoever has most frequently been knocked by Roar will receive aggro of any shielded Ugnaughts.

The sooner the boss can be pulled into the magnet, the less damage will be taken. Aim for getting ONE to TWO Pipe Smashes before magnet maximum. Two smashes will hurt but will allow the freshly spawning Ugnaughts to explode safely away from the raid. Three smashes can be survived but will more than likely kill people. Four smashes will kill everyone (yes, you can use cooldowns and prove this wrong).
Pipe Smash
Each Pipe Smash after the first grants a stack of Pipe Fury to Grob'thok, causing all Ugnaughts to explode for proximity damage and increasing the damage of subsequent Pipe Smashes.The sooner the boss can be pulled into the magnet, the less damage will be taken. Aim for getting ONE to TWO Pipe Smashes before magnet maximum. Two smashes will hurt but will allow the freshly spawning Ugnaughts to explode safely away from the raid. Three smashes can be survived but will more than likely kill people. Four smashes will kill everyone (yes, you can use cooldowns and prove this wrong).
Magnetic Lift
The magnet will now kill anyone it lifts upon release. The magnet also moves much quicker than in Story/Hard mode.
Mining Droid
Mining Droid
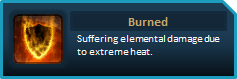
Two players will now be targeted by the Mining Droid, causing trails of lava to form at the players feet every second for 10 seconds. Stepping into the lava causes players to be Burned, a damage over time effect dealing elemental damage, stacking each time the player reenters the lava trail.
|
Dreadful Ugnaught
Health: 76,365
|
They seem to whichever tank has most recently been knocked back by Grob'thok's roar effect. This tanks job is to kite them into the lava to remove the shield. When the shield is removed, normal aggro tables resume (offtank should pick them up) and then they are dps’ed down as usual.
Note that the Ugnaughts hit incredibly hard on Nightmare, tearing through DPS and healers and devastating tanks. Tanks should kite the adds even after the shields are down to avoid damage. Tanks should also avoid tanking both Ugnaughts and Grob'thok.
Any Ugnaughts that remain during Pipe Smash will explode after the second hit, dealing damage based upon proximity.
Any Ugnaughts that remain during Pipe Smash will explode after the second hit, dealing damage based upon proximity.
It is imperative that raiders use defense cooldowns and avoid Ugnaughts like the plague during a second Pipe Smash. Being in melee range or even close by will kill you (~40k damage) without extra protection from cooldowns.
Strategy:
Overview
Nightmare Grob'thok is plagued with RNG mechanics that are surprisingly efficient at wiping the most prepared of raids. Despite the randomness of the encounter, raids with proper strategy can diminish these problems and achieve success.
This fight is centered around tanks, who must use every trick in their arsenal to effectively fulfill their many roles throughout the encounter.
 |
Inspiration/Bloodthirst
The Grob’thok encounter can drag on long enough for two Inspirations/Bloodthirsts to be used. Use the first during the first Pipe Smash and the second as soon as it is off cooldown, preferably during another Pipe Smash but enrage timer may not allow for it. |
The Magnet and Tanking
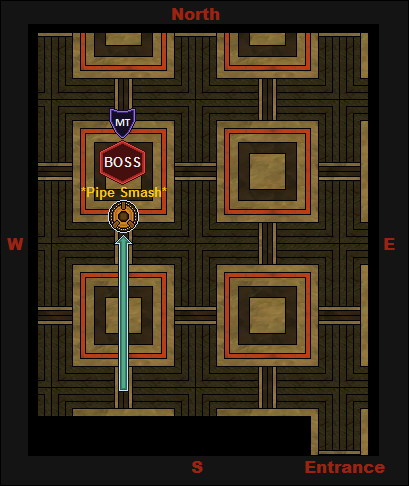
Before even discussing the tanks role with kiting Ugnaughts, the foundations of positioning must be understood. The magnet takes approximately 40 seconds to move in its predictable rectangular pattern, with the long ends on the east and west sides and the short ends on the north and south side as shown below:
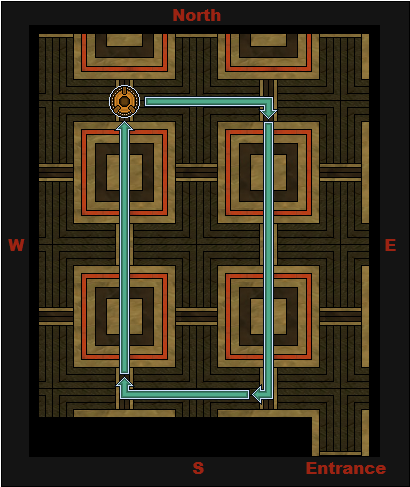
Before engaging the boss, the magnet will only move when a player is out of the entrance alcove and in the main room. When making attempts on Grob'thok, it is important that your raid group establishes a set position for the magnet before pulling. This will minimize any randomness of positioning and allow the tanks to know where to hold Grob'thok for Pipe Smash. <Failure> waits for the magnet to pass between the exact center of the two East squares, as illustrated below:
Before engaging the boss, the magnet will only move when a player is out of the entrance alcove and in the main room. When making attempts on Grob'thok, it is important that your raid group establishes a set position for the magnet before pulling. This will minimize any randomness of positioning and allow the tanks to know where to hold Grob'thok for Pipe Smash. <Failure> waits for the magnet to pass between the exact center of the two East squares, as illustrated below:
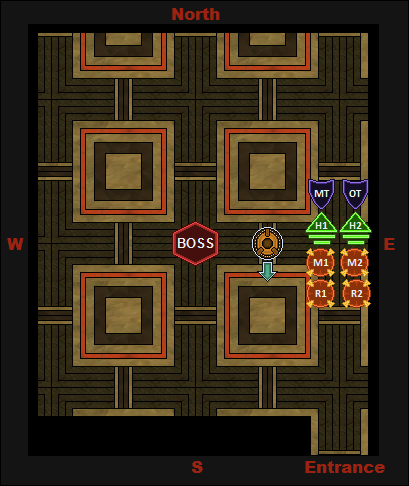
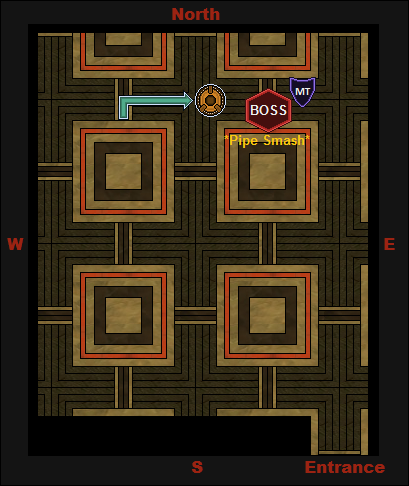
Tanking: Rotation Z (The Pull)
The main tank waits for the magnet to pass between the two East squares and immediately pulls and faces the boss anywhere along the West or North walls. The first Roar occurs rather quickly after pulling, so it is important that the offtank is ready to draw aggro as soon as the knockback occurs and NOT when the Roar effect expires, as it will continue to damage the knocked down tank!
Devoid of any knockback immunity trickery, the main tank, who initiates the fight, will be responsible for positioning the boss for the first Pipe Smash. Only if using <Failure> pull positioning, the boss should be approximately a couple meters past the Northeast corner of the magnet rotation, as illustrated below:
Between the first and second hits of Pipe Smash, Ugnaughts will spawn. Typically, unless the raid is extremely low health or healers are having a difficult time keeping up, it is easier to allow the second Pipe Smash to go off to clear out the remaining adds (discussed in greater detail in the Ugnaught section).
Whenever Grob'thok is caught in the Magnet, it is important that everyone do as much damage to him as possible (even the tanks), as he seems to take increased damage during these phases. Pop all offensive cooldowns including Inspiration/Bloodthirst, which should allow it to be up again at the very end of the fight.
Tanking: Rotation A (SE Corner)
After Grob'thok is released from the magnet, the tank currently holding Grob'thok (Main tank) should continue to hold him until the next Roar. The other tank (Offtank) should move down the eastern lane of the magnet path and be ready to taunt as soon as the other tank is knocked back. The illustration below demonstrates this as well as the spawn point for the next magnet:
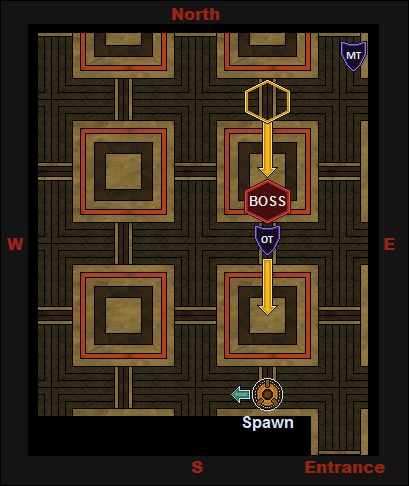
The Offtank should move the boss down the eastern lane toward the center of the Southeast square, stopping him in this position until the next Pipe Smash. Pay careful attention to not roar the raid or lose threat before reaching your destination.

Important
|
Grob'thok's Pipe Smash makes it difficult to position him without Hold the Line/Hydraulic Overrides. Position Grob'thok where he needs to be before Pipe Smash is crucial. Remember, it's always easier to position him before where he needs to be and backpedal away from the magnet than trying to turn him and move back toward the magnet!
|
Tanking: Rotation B (NW Corner)
After Grob'thok is released from the magnet, the tank currently holding Grob'thok (Offtank) should turn and move Grob'thok along the southern lane of the magnet path toward the western corner, paying careful attention to not Roar on the melee. The Offtank will continue to hold him until the next Roar, which occurs fairly quickly. The other tank (Main tank) should move up the western lane of the magnet path and be ready to taunt as soon as the other tank is knocked back. The illustration below demonstrates this as well as the spawn point for the next magnet:
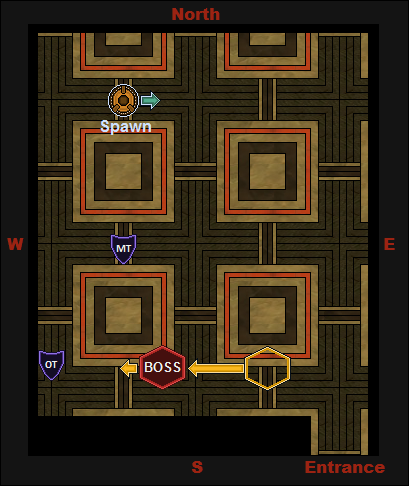
The Main tank should move the boss up the western lane toward the center of the Northwest square, stopping him in this position until the next Pipe Smash. Pay careful attention to not Roar the raid or lose threat before reaching your destination.

Important
|
Repeat for emphasis. Position Grob'thok behind where he needs to be and backpedal away from the magnet.
|
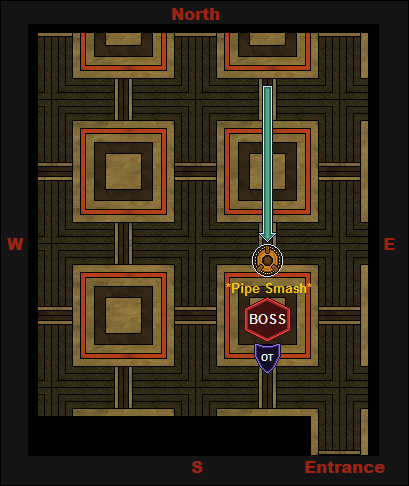
Tanking: Return to Rotation A (SE Corner)
After Grob'thok is released from the magnet, the tank currently holding Grob'thok (Main tank) should turn and move Grob'thok along the northern lane of the magnet path toward the eastern corner, paying careful attention to not Roar on the melee. The Main tank will continue to hold him until the next Roar:

The above will position you correctly to repeat the steps outlined in Rotation A above.
Tanking: The Pattern Continues
From there, tanks will resume Rotation A and then B and then A again, making the entirety of the fight: Z, A, B, A, B, A. After the final A, the boss will enrage, preventing it from being caught in the magnet and increasing its damage.For more detail on the progression of events throughout the fight, a compilation of events with time frames can be found in the link below:
Spreadsheet: Grob'thok Progression of Events
Enrage
With all the mechanics running rampant throughout the short six and a half minutes, inevitably DPS might be tight. As such, assuming timers are not completely off, it is possible to get Grob'thok under the magnet one last time before he enrages, buying time for DPS to work their magic and get the boss dead.
Tanks will want to position themselves ahead of the Rotation A position and get the boss under the magnet as soon as that final pipe is lifted up.
Ugnaughts: Mechanics and Aggro Tables
The mechanical and routine nature of performing this fight quickly crumbles under the light weight of the pig-snouted Ugnaughts, who are hell-bent on ruining a perfectly good killshot.
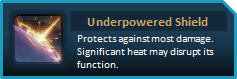
The goal for dealing with the Ugnaughts is simple in theory: get them into the lava to break their Underpowered Shields and kill them quickly. In practice, unfortunately, this can prove extremely challenging if your composition is not balanced or if a series of mistimed events throw off the kiting.
One common misconception with regards to the Ugnaughts is who they will aggro to throughout the fight. Below is a priority list demonstrating their chosen prey, with #1 being the preferred aggro target.
- The player who was most recently knocked back by the effects of Roar.
- A tank who has aggro on Ugnaughts due to Roar will lose aggro when the other tank is knocked back.
- Negating the knockback effects of Roar will not force the Ugnaughts to swap to you.
- When more than one person is knocked back from Roar, experience indicates the Ugnaughts will focus ONE Roared player at random.
- If immobilized/rooted to the ground, the closest player in melee range.
- The player who first initiated aggro, typically by attacking them when they spawn.
Once shields are down, Ugnaughts will resume normal aggro tables. This can compound the difficulties of the fight, especially when one or two of the three Ugnaughts lose their shields and have threat whilst the third is still aggroed based upon the above priority list.
Ugnaughts: Mitigating their Terror
The Ugnaughts are susceptible to all normal crowd control effects and may be slowed even when the snare is based around a damage dealing effect.
Rather than outlining one particular strategy for dealing with the Ugnaughts, below is an outline of each advanced class and the utility they can bring to the table toward dealing with them. Obviously this list is not exhaustive of every ability that could ever have an impact on add management, but rather a highlight of some of the most helpful. Note that this includes damaging and support abilities and not defensive cooldowns unless particularly unique to the encounter.
Also note that many of the abilities listed below involve stunning, slowing, or rooting the adds. Obviously there are arguments for why all of these abilities should be used with extreme caution and foresight, as using them while completely disregarding the mechanisms of the fight can make disabling their Underpowered Shields extremely and arbitrarily challenging.
Trooper/Bounty Hunter
Hold the Line/Hydraulic Overrides
Hail to the king! If there ever was an MvP award for most useful ability in a boss fight, this one would win hands down. Let’s go through some of its benefits, shall we?
- Allows for continued casting and unimpeded movement during Overhead Smash and Pipe Smash.
- Increases movement speed and allows for ease with kiting Ugnaughts on a reasonably short cooldown.
- Prevents the knockback effect and aggro dump from Roar and negates the need for an offtank to kite adds into fire. Because of the ability to snap threat the adds, preventing the knockback will allow whoever initially got aggro to hold aggro for longer. A range DPS with AoE slows are perfect for this role and typically already in position at lava placement.
Vanguard/Powertech
Harpoon/Grapple
A great single target pull, capable of grabbing a single Ugnaught with Underpowered Shields who may have missed the lava away from the raid and subsequently stunning that Ugnaught with Cryo Grenade/Electro Dart.
Neural Surge/Carbonize
An AoE stun that can stall Ugnaughts while waiting for the Mining Droid to start spewing lava on the floor. Wonderfully handy.
Pulse Cannon/Flame Thrower
Great for killing Ugnaughts but possess added utility when specialized in Tactics/Advanced Prototype with talent points in Pulse Generator/Prototype Flame Thrower, as the ability becomes a slow as well.
Riot Gas/Oil Slick
A ground based AoE slow can do wonders, in particular with tanking Grob’thok when Ugnaughts spawn behind you. Forces them to move at a slow rate right out of the gates.
Storm/Jet Charge
Gap closing ability and clutch single target immobilize. As with any rooting effect on this fight, Ugnaughts who are unable to move to/attack their aggroed target will switch to anyone in melee range until the root is broken.
Commando/Mercenary
Concussion Charge/Jet Boost
An 360 AoE knockback that can aid in throwing Ugnaughts into the lava or in assisting the tanks in avoiding their pint-sized fury. All knockbacks should be used with caution, as misuse of knockbacks can make positioning adds more difficult or waste lava currently on the ground.
Kolto Bomb/Kolto Missile
The slowing effects of this healing ability granted when specialized in Combat Medic/Bodyguard with talent points in Kolto Residue can offer additional, albeit often accidental, crowd mitigating effects.
Jedi Knight/Sith Warrior
Awe/Intimidating Roar
This often underused ability in raid settings shines on this fight, not only providing a 6 second AoE cc but also ignoring the damage breaking component due to Ugnaught damage immunity while Underpowered Shields are still active. Use caution not to overuse this ability however, as using it at the wrong time will make it impossible to break and may cause missed opportunities to get Ugnaughts into lava.
Another useful application is to use it in conjunction with the Mining Droid. When the Mining Droid targets you, run to the Ugnaughts and pop this ability afterwards run rings around the adds until their shields break.
Force Leap/Force Charge
Gap closing ability and clutch single target immobilize. As with any rooting effect on this fight, Ugnaughts who are unable to move to/attack their aggroed target will switch to anyone in melee range until the root is broken.
Jedi Guardian/Sith Juggernaut
Force Push/Force Push
A well timed single target knockback can do wonders to get the Ugnaughts in the lava. All knockbacks should be used with caution, as misuse of knockbacks can make positioning adds more difficult or waste lava currently on the ground.
Freezing Force/Chilling Scream
An excellent AoE slow effect, though use with caution as it requires the player to be in melee range of its slowed targets. Use during kiting or while Ugnaughts are in transit towards the aggro target. Spammable for free in tank spec.
Guardian Leap/Intercede
Useful to quickly put distance between the player and Ugnaughts. Particularly effective for tanks kiting the Ugnaughts, who can have another player set themselves behind lava and jump to them. Typical progression of events for tank would be to get knocked back from Roar, jump to the boss and then hop again to a player, putting upwards of 60 meters between the player and Ugnaughts and for perfect shield-break setup.
Jedi Sentinel/Sith Marauder
Transcendence/Predation
This ability is extremely effective at handling the adds, especially when there are more than one set and they are spread out, as it bypasses the need for AoE slows to hit all enemies and instead applies the speed change directly to the raid. Obviously, the ability comes at a substantial cost to DPS, and should be used only when no better alternative is available or in exigent circumstances.
Twin Saber Throw/Dual Saber Throw
A great ability against Ugnaughts, applying a slow and decent damage to clumps at range without needing to chase them down. Not an effective slow to use while Underpowered Shields are still active.
Smuggler/Imperial Agent
Flash Grenade/Flash Bang
Similar to Awe/Intimidating Roar, this incapacitating effect will control Ugnaughts while not being broken by damage while Underpowered Shields are active. The Scoundrel/Operative variety is particularly potent, as it affects multiple targets.
Shrap Bomb/Corrosive Grenade
Despite its obvious benefits in destroying the adds, this AoE dot shines when specialized in Dirty Fighting/Lethality with talent points in Feelin’ Woozy/Adhesive Corrosive, as the ability effectively becomes a spammable, 6-second slow. When paired with a Vanguard/Powertech using Hold the Line/Hydraulic Overrides to prevent knockback/aggro drop, this ability can allow the Gunslinger/Sniper to inherit a role as kiter.
Gunslinger/Sniper
Hightail It/Covered Escape
Useful gap-creating ability when kiting or avoiding Ugnaughts. SEE Shrap Bomb/Corrosive Grenade above for kiting.
Pulse Detonator/Cover Pulse
An 360 AoE knockback and 5 second root that can aid in throwing Ugnaughts into the lava or in assisting the tanks in creating distance between the Ugnaughts. All knockbacks should be used with caution, as misuse of knockbacks can make positioning adds more difficult or waste lava currently on the ground. As with any rooting effect on this fight, Ugnaughts who are unable to move to/attack their aggroed target will switch to anyone in melee range until the root is broken.
Scrambling Field/Ballistic Shield
While not necessarily useful in controlling the Ugnaughts, this ability is important to note in that it can mitigate damage from the adds and prevent deaths if/when they explode during Pipe Smash. Get accustom to when big influxes of damage occur and use this ability liberally throughout the fight.
Scoundrel/Operative
Scamper/Exflitrate
Useful gap-creating ability when kiting or avoiding Ugnaughts. SEE Shrap Bomb/Corrosive Grenade above for kiting.
Jedi Consular/Sith Inquisitor
Force Speed/Force Speed
Obvious benefits are obvious. 150% movement speed allows for clutch getaways and kiting.
Force Wave/Overload
An AoE knockback that can aid in throwing Ugnaughts into the lava or in assisting the tanks in escaping them. All knockbacks should be used with caution, as misuse of knockbacks can make positioning adds more difficult or waste lava currently on the ground.
Jedi Shadow/Sith Assassin
Force Pull/Force Pull
A great single target pull, capable of grabbing a single Ugnaught with Underpowered Shields who may have missed the lava away from the raid and subsequently stunning that Ugnaught with Force Stun/Electrocute.
Phase Walk/Phase Walk
An excellent tool for putting distance between yourself and the Ugnaughts, especially when kiting as a tank or immediately after a Roar.
Slow Time/Wither
Another handy AoE slow effect with the added bonus of reducing damage dealt by 5%.
Jedi Sage/Sith Sorcerer
Rescue/Extrication
Pulling a tank immediately after a Roar or after you’ve positioned yourself against lava can set up a great assist for Ugnaught destruction. While Ugnaughts under the effects of Underpowered Shields do not have traditional aggro tables, use caution when pulling a tank who currently has aggro on Grob’thok or on non-shielded Ugnaughts.
Telekinetic Wave/Chain Lightning
Great for killing Ugnaughts but possess added utility when specialized in Telekinetics/Lightning with talent points in Cascading Force/Lightning Swarm, as the ability becomes an immobilize and slow all in one. As with any rooting effect on this fight, Ugnaughts who are unable to move to/attack their aggroed target will switch to anyone in melee range until the root is broken.

Congratulations, you have now successfully read the guide you should have read last night when wiping on Nightmare Grob'thok!


I appreciate the guide, it is really high quality and my guild will certainly be using it.
ReplyDeleteThank your for your NiM guides. The map for this fight is really going to help our tanks with positioning Grob'thok.
ReplyDelete